Learn how to repurpose a cheap Chromebox into a versatile mini PC capable of running Minecraft servers, remote gaming, and more. This guide covers firmware flashing, hardware upgrades, and performance benchmarks.
Table of Contents
Uncovering Hidden Potential in a Chromebox
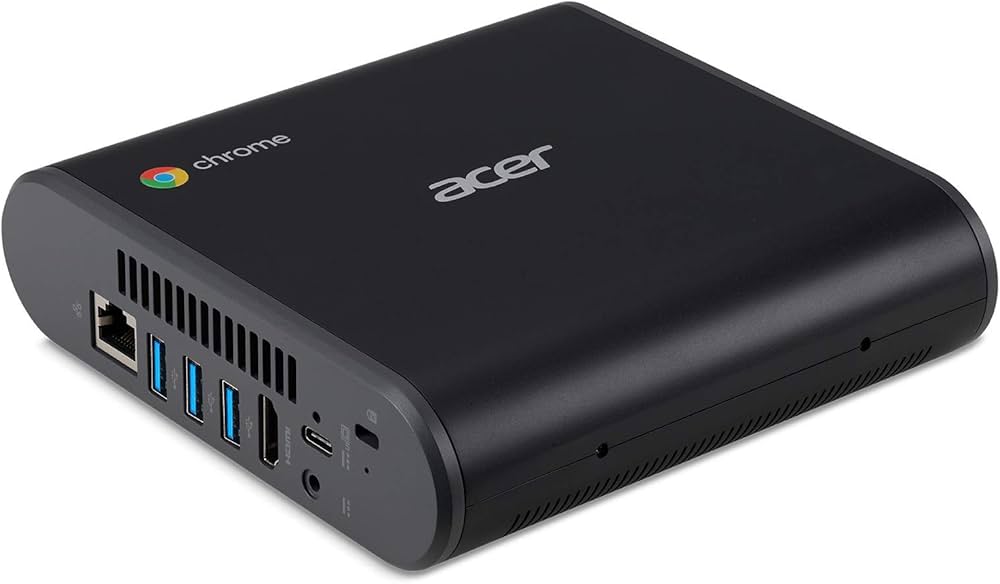
When browsing online marketplaces, it’s not uncommon to come across seemingly outdated or limited devices at bargain prices. One such find was an Acer CXi3 Chromebox, purchased for a mere $25 (plus tax and shipping). While Chromeboxes are typically restricted to running Chrome OS, this guide will show you how to unlock its full potential and transform it into a versatile mini PC.
What is a Chromebox?
Chromebox devices are essentially the desktop equivalent of Chromebooks. They run Chrome OS, which is primarily designed for web browsing and basic file management. Unlike traditional PCs, Chromeboxes have specialized firmware that prevents the installation of alternative operating systems like Windows or Linux distributions.
The Acer CXi3: Specifications and Features
The Acer CXi3 model used in this project comes with impressive specifications for its price point:
- CPU: 8th Gen Intel i3-8130U (2.2 GHz base, 3.4 GHz boost)
- RAM: 8GB DDR4 (upgradeable)
- Storage: 64GB SSD (upgradeable)
- Connectivity: Gigabit Ethernet, Wi-Fi, Bluetooth
- Ports: 5x USB 3.0, HDMI, audio jack, microSD card reader
- Power: Standard barrel jack and USB-C power delivery support
Unlocking the Chromebox
Before modifying the firmware, it’s crucial to gain full access to the device. In this case, the Chromebox was locked by a school district’s management system. Fortunately, Acer provides recovery instructions that allow for a complete reset:
- Use a paperclip to press the recovery button on the back while powering on the system
- Follow the on-screen prompts to erase all local data
- This process removes both user data and organizational management
Flashing Custom Firmware
To transform the Chromebox into a standard PC, we need to replace the Chrome OS firmware with a more versatile UEFI firmware. This process involves some risk, so it’s essential to follow instructions carefully and understand the potential consequences.
Preparation
- Visit the MrChromebox.tech website for detailed instructions and resources
- Verify that your specific Chromebox model is supported
- Enter developer mode on the Chromebox
- Disable firmware write protection (usually by removing a specific screw on the motherboard)
Flashing Process
- Boot into Chrome OS and access the VT2 shell (Ctrl + Alt + F2)
- Download and run the firmware utility script
- Choose the “UEFI (Full ROM)” option to completely replace the firmware
- Follow the prompts and warnings carefully
- Allow the process to complete and reboot the system
Hardware Upgrades
With the new firmware in place, the Chromebox can now accept hardware upgrades like a standard PC:
- Storage: Replace the 64GB SSD with a larger NVMe drive (e.g., 1TB)
- RAM: Upgrade to 32GB (2x16GB) if needed
- Expansion: The M.2 E-key slot supports PCIe Gen 3 (1x), allowing for additional storage or other compatible devices
Operating System Installation
The modified Chromebox can now run various operating systems. Some options tested include:
- Proxmox VE: A powerful virtualization platform
- Windows: For general-purpose computing and benchmarking
- Linux distributions: Versatile options for various use cases
Performance and Efficiency
One of the most impressive aspects of this modified Chromebox is its efficiency:
- Idle power consumption: As low as 1.5W (with optimizations)
- Low-load tasks: Comparable efficiency to a Raspberry Pi
- Full load: Up to 31W power draw
Benchmarks
To gauge the system’s performance, several benchmarks were run:
Geekbench 5
- Single-core score: 1267
- Multi-core score: 2662
Cinebench R23
- Single-threaded score: 778
- Multi-threaded score: 1786
While not breaking any records, these scores indicate that the system is capable of handling a wide range of tasks efficiently.
Practical Applications
The modified Chromebox proves to be a versatile mini PC suitable for various use cases:
Home Server
The low power consumption and decent performance make it an excellent choice for a home server. Some potential applications include:
- Minecraft server hosting
- Media streaming (e.g., Jellyfin)
- Network-wide ad blocking (Pi-hole)
- Home automation (Home Assistant)
- System monitoring (Uptime Kuma)
Media Center
With its small form factor and HDMI output, the Chromebox can serve as a capable media center PC:
- Kodi or Plex for local media playback
- Streaming service apps
- Light gaming via game streaming services
Remote Gaming
Using software like Moonlight, the Chromebox can stream games from a more powerful PC:
- Capable of 1080p or 1440p at 60 Hz
- 4K limited to 30 Hz due to HDMI 1.4b
Basic Desktop Computing
For users with modest computing needs, the modified Chromebox can handle everyday tasks:
- Web browsing
- Office applications
- Light productivity software
Also Check: Andbox H618: Best Android TV Box for Streaming
Advantages of the Modified Chromebox
- Cost-effective: Exceptional value for the price
- Energy-efficient: Very low power consumption for lightweight tasks
- Upgradeable: Supports storage and RAM upgrades
- Versatile: Can run various operating systems and applications
- Compact: Small form factor ideal for space-constrained setups
- USB-C Power Delivery: Flexible power options
Challenges and Considerations
While the process of modifying a Chromebox can be rewarding, it’s important to be aware of potential challenges:
- Firmware flashing risks: Possibility of bricking the device
- Limited support: May require troubleshooting uncommon issues
- Performance limitations: Not suitable for demanding tasks or heavy multitasking
- Potential hardware incompatibilities: Some components may not work with all operating systems
Optimizing Performance and Efficiency
To get the most out of your modified Chromebox, consider these optimization tips:
Power Management
- Use PowerTop to identify and optimize power consumption
- Enable CPU power-saving features in the UEFI settings
- Adjust operating system power management settings
Storage Optimization
- Enable TRIM for SSDs to maintain performance
- Use appropriate file systems (e.g., ext4 for Linux, NTFS for Windows)
- Regularly perform disk cleanup and defragmentation (for HDDs)
Thermal Management
- Ensure proper ventilation around the device
- Clean dust from vents and internal components periodically
- Consider using a small USB fan for additional cooling if needed
Network Optimization
- Use a wired Ethernet connection for best performance and stability
- If using Wi-Fi, ensure you’re connected to a 5 GHz network when possible
- Update network drivers to the latest version
Expanding Functionality
The modified Chromebox’s potential can be further expanded with additional hardware and software:
External GPU (eGPU)
While not officially supported, some users have successfully connected eGPUs to similar devices using the M.2 slot:
- Research compatible eGPU adapters
- Carefully modify the chassis to accommodate the adapter
- Install appropriate drivers for the GPU
Network Attached Storage (NAS)
Leverage the Chromebox’s efficiency to create a low-power NAS:
- Install a NAS-oriented operating system (e.g., OpenMediaVault, FreeNAS)
- Connect external drives via USB 3.0
- Configure network shares and services
Cluster Computing
For those interested in distributed computing or learning about clustering:
- Set up multiple modified Chromeboxes
- Install a cluster management system (e.g., Kubernetes, Docker Swarm)
- Experiment with load balancing and distributed applications
Troubleshooting Common Issues
When working with modified hardware, you may encounter some challenges. Here are solutions to common issues:
Slow Network Performance
If you experience slow download speeds, especially in Linux-based systems:
- Disable Energy Efficient Ethernet (EEE) in the operating system
- Update network drivers to the latest version
- Test with different Ethernet cables
Boot Issues
If the system fails to boot after modification:
- Reset the CMOS by removing the battery for a few minutes
- Ensure all components are properly seated
- Try booting with minimal hardware (e.g., one RAM stick, no additional storage)
Operating System Compatibility
Some operating systems may have issues with specific hardware components:
- Research known compatibility issues for your Chromebox model
- Try different Linux distributions or Windows versions
- Use community forums to find solutions for your specific setup
Future Possibilities
As the community continues to explore and modify Chromeboxes, we can expect:
- Improved custom firmware with additional features
- Better documentation and support for various models
- New use cases and applications discovered by enthusiasts
Conclusion
Transforming a $25 Chromebox into a versatile mini PC is a rewarding project that demonstrates the potential of repurposing seemingly limited hardware. With careful modification, these devices can serve a wide range of purposes, from efficient home servers to compact media centers.
While the process involves some risk and requires technical knowledge, the results can be impressive, especially considering the low initial investment. As electronic waste becomes an increasing concern, projects like this highlight the importance of extending the lifespan of existing hardware through creative repurposing.
Whether you’re a tinkerer looking for a new project or someone in need of an affordable, efficient computing solution, a modified Chromebox could be an excellent option to consider. Just remember to approach the modification process with caution, do thorough research, and enjoy the journey of breathing new life into old hardware.
Image Credit: Acer